Monday, May 27, 2013

Strawberry Mint Limeade


Okay, okay, okay...here's the recipe!

I started making this for family get-togethers at the Redd's and everyone loved it.  I used to use fresh limes but that's a lot of work and doesn't really make a difference in the result.  I have served this at Young Women's functions, my wedding, our niece asked me to make it for her wedding and this picture is from Cassie's (Bruce's daughter) mission farewell yesterday.  Everyone seems to really love it.  Heck, I love it too.  

Here's a recipe that I worked out a few years ago.  The yield isn't much:

Wendy's Strawberry Mint Limeade
1 can Frozen limeade (you may substitute fresh lime juice but you will have to use more sugar)

1 cup Sugar (more or less to taste)

2 liters Club Soda

1/2 cup Frozen strawberries (you may use fresh if available)

1 sprig Fresh mint

Ice

Remove strawberries from the freezer and place in a bag and let thaw a little. When they are thawed a little mash them while they are still in the bag with your fingers just to break them up. Mash the fresh mint in the bottom of the container that you will be serving this from to release the flavor of the mint. Add the frozen limeade, sugar and strawberries to the container. Pour in the club soda. Mix thoroughly but don't overmix, add ice and serve.

Here's how I make large batches, to serve 100s of thirsty people:

I buy lot's of cans of frozen limeade.  I look for special deals on the stuff leading up to an event or at the beginning of summer when I think I will make it.  Then I dump the cans of limeade in a container and add sugar.  I add about 1-2 cups of sugar for each can of limeade. Then I divide this mixture into quart storage containers and refreeze those.  When I'm ready to whip up a batch I get a bunch of frozen strawberries (about 1 cup) and put that in a Ziploc bag.  I add some cleaned and chopped mint leaves to the strawberries and let the strawberries thaw a little.  When they are thawed enough to mash them I start mashing them in the bag with the mint.  I add the strawberries and mint, 1 quart of limeade mixture and 1 bottle (2 liter bottle) to a big food grade 5 gallon bucket and mix it up.  When that is mixed well I add 2 more bottles of club soda and gently stir.

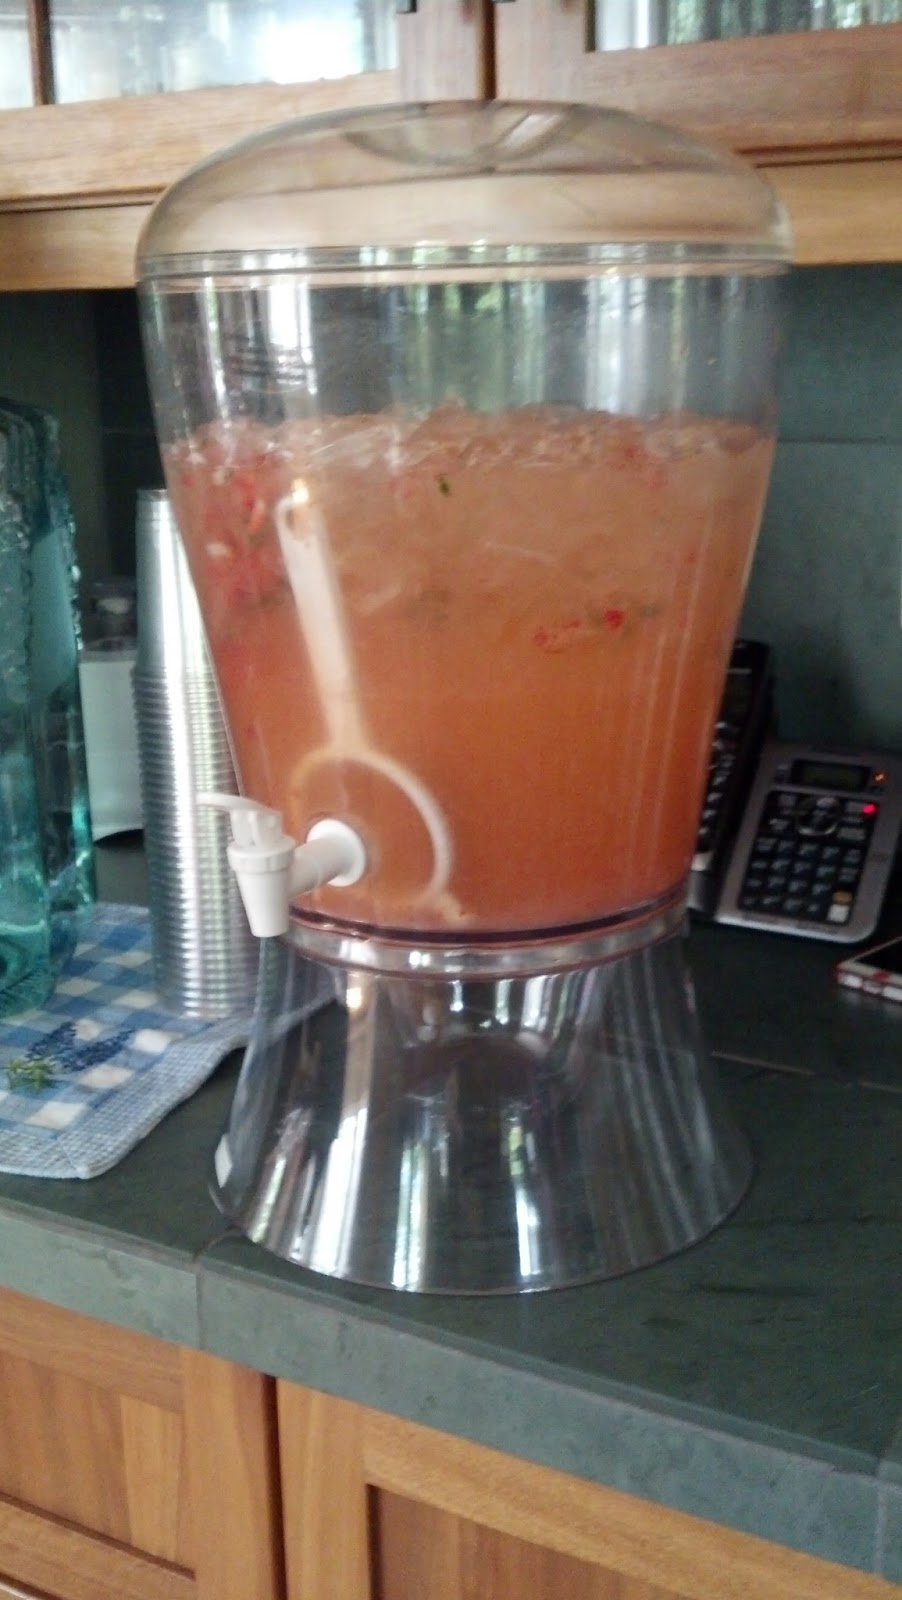
Here's some hints for those using a drink dispenser like the one shown above.  

The strawberries and mint leaves are kind of a problem.  They get stuck in the spout really easily.  Here's how I've solved that problem:  I bought a small plastic strainer that I place over the spout inside of the dispenser.  If you look closely, you can see it in the picture.  It's white and has a handle.  I then add ice to the dispenser.  About half way is usually good.  Then I add the drink mixture over the ice.  The ice usually holds the strainer in place.  You can usually add another batch of drink mixture to the ice when the first batch is almost gone.  On the third batch of drink mixture you should add more ice to keep the strainer in place and/or have someone hold the strainer in place with a long handled spoon while you pour in the drink mixture, otherwise the strainer will want to float away.  You may want to add some sliced lemons and limes to the dispenser to make it look pretty.  I also would make sure that you serve ice on the side so that people can add ice cubes to their drinks. 

Lately, I've been thinking that I should make a simple sugar syrup instead of just adding the sugar to the frozen limeade.  I always have some undissolved sugar at the bottom of my containers, its easy to mix it in but you wouldn't have this problem if you used a simple sugar. To make a simple sugar syrup add 2 parts sugar to 1 part water to a saucepan, bring to the boil and then lower the heat until the sugar is dissolved (the syrup will be clear), cool then add instead of dry sugar to the frozen limeade mixture.

I almost always have some of the base mixture in my freezer and bottles of club soda so that I can bring this to some party with little or no notice.  It's way easier than making cookies.

Thursday, November 8, 2012

Roast Pork


I love pork...heck I love pigs! They are cute and they are delicious. Several years ago my then fiancee, now husband commissioned a nativity set of pigs for me.  Above you'll see the pig angels, I love pigs with wings.

I didn't eat pork for a while after the movie "Babe" came out but I'm back to eating it now. In China when they talk about meat they mean pork unless they specify otherwise.

Cooking pork can be a little tricky.  It seems to be easy to cook it so that it is too dry.  So I've been trying to figure out how to do a nice pork roast for Sunday supper, something that is...you know...easy.  I was watching America's Test Kitchen (ATK) and they did this.  It looked pretty good but I kind of forgot to do the peach sauce and I didn't quite follow their directions and my pork roast came out pretty good and it was a little easier than their's was, so here's how I did it:

Roast Pork

1 Boneless Boston Butt pork roast (about 4-5 pounds)
1/2 C brown sugar
1/2 C kosher salt

I chose a boneless Boston Butt (shoulder) roast that was about 4-5 pounds.  There wasn't anything bigger and that is what is in the stores around here.  It had some fat on it but not as much as ATK showed in their recipe.

The night before I mixed up the brown sugar and the salt and rubbed it on the roast and put all of that in a plastic bag, in the fridge overnight.

When I came home from church at noon I got the roast out of the fridge and I patted it dry and put it on a rack on one of my sheet pans that I use for a lot of cooking.  I set the oven temperature to 300 degrees and set my thermometer with a probe like this one. to 170 degrees, put the probe in the middle of the roast and put the roast in the oven with the probe wire coming from the oven to the thermometer.  I added water to the bottom of the pan to collect the juices and to stop them from smoking up the oven.  Then I left it all for about 4 hours.  After about 3 hours it didn't seem like it was cooking fast enough so I turned up the temperature to about 325 degrees until the alarm on the probe went off at 170 degrees.

I removed it from the oven and covered it with foil and let it rest for about an hour.  I collected the water and  pork juices from the bottom of the pan and made a nice gravy.

Once the rest of my meal was prepared I sliced the roast and boy was it good. It was moist and tender and delicious.  I'll definitely be doing roast pork again!

Monday, November 5, 2012

Hot Pepper Jam

Bruce's Mom and Dad make this with hot peppers from the garden and it is really delicious.  I like to take about a cup of this jam and pour it over a package of cream cheese.  Then I serve crackers (I prefer Triscut or Ritz) with it. It is the fastest appetizer you can imagine and everyone loves it.  You can serve it on bread like any other jam if you like.

Hot Pepper Jam

1. Prepare 3 1/2 to 4 pints (for 7 to 8 cups jam) lids in hot water.
2. Measure 6 1/2 cups sugar and set aside
3. Mix thoroughly in a 6 to 8 quart pan
    3/4 cup to 1 1/4 cup finely diced hot peppers
    or 1/4 cup to 1/2 cup dried hot peppers
    2 cups finely diced bell peppers
    1 1/12 cup cider vinegar
4. Bring to a full rolling boil (that cannot be stirred down) stir constantly on high heat
5. Boil for 1 minute
6. Quickly add sugar - stirring constantly and bring to a full rolling boil that cannot be stirred down.
7. Boil for 1 minute
8. Remove from heat.  Quickly skim off any foam and ladle into jars.
9. Carefully clean rims and jars making sure there is no residue. Put on a warm lid and crew band.
10. Place jars in boiling water (water should cover the top of the jars by 2 inches).
11. When the water begins to boil again, boil the filled bottles for 15 minutes (at Salt Lake City's elevation)
12. Remove bottles from boiling water and set on a folded towel or a wodden bread board.
13. Cool 12 to 24 hours, Test for seal and store in a cool, dark and dryp place for up to a year.
14. Refrigerate after opening.

Tuesday, May 1, 2012

Spices


I found this website today that has a couple of really good references.  One is a Flavor Map.  The other is a Spice Use Chart that looks really useful.


Saturday, July 9, 2011

Grandma's Shrimp Salad...kinda'


My Grandma Brown made the best shrimp salad.  My aunts make it now and their's is just as good.  Last week I made some shrimp salad in the tradition of Grandma Brown and my brother said it was the best shrimp salad he had ever eaten, and I liked it too.  So I thought I'd write it down for the next time that I want to do it.  This isn't a tested recipe so I'm sorry I don't have exact measurements on everything.  Grandma made it with tiny pasta shells rather than elbow macaroni.  I like the elbow macaroni because it is shaped like shrimp.  Use whatever you have.  I'm sure Grandma never used greek yogurt but everything else is pretty close to the way she made it (I think).  I think that what made my brother say it was the best was the amount of salt I put in but it could be the combination of yogurt and homemade salad dressing that I used.

I had some frozen shrimp in the freezer but they were large so I just cut them up into pieces about the size of a pea.  I think grandma used tiny canned shrimp.  I think it is best with some kind of fresh or frozen shrimp rather than canned.

I hate Miracle Whip, I'm a mayonnaise girl all the way, but this salad really screams for Miracle Whip! Because I don't buy Miracle Whip (or mayonnaise for that matter) I made my own "salad dressing" the same way I make mayonnaise, only I added about 2 tablespoons of apple cider vinegar for the acid and about 1-2 tablespoons of sugar, a pinch of salt, and 1 teaspoon of dry mustard to 1 egg and 1 cup oil.  Check out how I do it  here.  If you don't want to make your own use good ol' Miracle Whip, no problem.

This is a great salad for those summer pot lucks. Just check with me if you are going to bring it to a pot luck I'm at.


Grandma B's Shrimp Salad

About 1 lb elbow macaroni (tiny pasta shells)
1 stalk of celery, chopped
about 5 green onions, chopped
about 5-6 chopped hard boiled eggs
Shrimp (about the size of the pasta)
1 cup Miracle Whip
about 3/4 cup greek yogurt
salt to taste

Cook the elbow macaroni in well salted water.  Drain, and run cold water over the pasta to stop the cooking and cool the pasta.  Drain the pasta well.  Taste the pasta for saltiness, add salt to taste.  Add the rest of the ingredients and mix.

Monday, May 30, 2011

French Onion Soup

A few weeks ago I picked up my first Bountiful Basket.  I love the concept.  Monday at 10 AM I check the web site and give them my contribution.  Saturday morning I go and pick up the order.  You never know what you are going to get and that week there were 10 onions in the basket.  I love this recipe for French Onion Soup that I got from Cooks Illustrated so this is what I made.  I froze the soups in small one cup containers that fit perfectly in my French Onion Soup bowls.  When I'm ready, I pop one of the frozen soups out,  put it in the soup bowl and microwave it for a couple of minutes until it is bubbling.  Meanwhile, I preheat the oven broiler.  Once the soup is warm I top it with the croutons and the cheese, pop it under the broiler for a couple of minutes until the cheese is melted and brown and then enjoy this soup.  I hope you like it as much as I do.


French Onion Soup, from Cooks Illustrated


3             tablespoons unsalted butter, cut into 3 pieces
6             large yellow onions (about 4 pounds), halved and cut pole to pole into 1/4-inch-thick slices
  Table salt
2             cups water, plus extra for deglazing
1/2          cup dry sherry
4             cups low-sodium chicken broth
2             cups beef broth
6             sprigs fresh thyme, tied with kitchen twine
1             bay leaf
   Ground black pepper
1             small baguette, cut into 1/2-inch slices
8             ounces shredded Gruyère cheese (about 2 1/2 cups)          


1. For the soup: Adjust oven rack to lower-middle position and heat oven to 400 degrees. Generously spray inside of heavy-bottomed large (at least 7-quart) Dutch oven with nonstick cooking spray. Place butter in pot and add onions and 1 teaspoon salt. Cook, covered, 1 hour (onions will be moist and slightly reduced in volume). Remove pot from oven and stir onions, scraping bottom and sides of pot. Return pot to oven with lid slightly ajar and continue to cook until onions are very soft and golden brown, 1 1/2 to 1 3/4 hours longer, stirring onions and scraping bottom and sides of pot after 1 hour.

2. Carefully remove pot from oven and place over medium-high heat. Using oven mitts to handle pot, cook onions, stirring frequently and scraping bottom and sides of pot, until liquid evaporates and onions brown, 15 to 20 minutes, reducing heat to medium if onions are browning too quickly. Continue to cook, stirring frequently, until pot bottom is coated with dark crust, 6 to 8 minutes, adjusting heat as necessary. (Scrape any fond that collects on spoon back into onions.) Stir in 1/4 cup water, scraping pot bottom to loosen crust, and cook until water evaporates and pot bottom has formed another dark crust, 6 to 8 minutes. Repeat process of deglazing 2 or 3 more times, until onions are very dark brown. Stir in sherry and cook, stirring frequently, until sherry evaporates, about 5 minutes.

3. Stir in broths, 2 cups water, thyme, bay leaf, and 1/2 teaspoon salt, scraping up any final bits of browned crust on bottom and sides of pot. Increase heat to high and bring to simmer. Reduce heat to low, cover, and simmer 30 minutes. Remove and discard herbs, then season with salt and pepper.

4. For the croutons: While soup simmers, arrange baguette slices in single layer on baking sheet and bake in 400-degree oven until bread is dry, crisp, and golden at edges, about 10 minutes. Set aside.

5. To serve: Adjust oven rack 6 inches from broiler element and heat broiler. Set individual broiler-safe crocks on baking sheet and fill each with about 1 3/4 cups soup. Top each bowl with 1 or 2 baguette slices (do not overlap slices) and sprinkle evenly with Gruyère. Broil until cheese is melted and bubbly around edges, 3 to 5 minutes. Let cool 5 minutes before serving.

Wednesday, February 2, 2011

Hot Mushroom Dip

With the Super Bowl coming up this weekend I thought I'd post my mushroom dip recipe.  This recipe freezes well so I usually make a big batch and then nuke it when it is needed.  Even though there are a lot of onions in this recipe there are onion haters that I know who love this dip and ask me to bring it to certain family get-togethers.  

I got the inspiration from Hope Miller who is Orson Miller's wife.  Orson Miller was a renowned mycologist and wrote a very good book about North American Mushrooms (http://www.amazon.com/North-American-Mushrooms-Inedible-Falconguide/dp/0762731095/ref=sr_1_1?ie=UTF8&qid=1296658756&sr=8-1). I met Hope and Orson the summer before he died, at a Utah Mushroom Society foray along the Mirror Lake Highway.  Hope made a version of this recipe but I didn't quite agree with the way that she made it so I came up with this method.  

I usually serve this hot with wavy potato chips.  It is kind of thick so regular potato chips won't stand up to being dipped in it.  I have used different kinds of mushrooms for this.  White button mushrooms work well but I really like more flavorful mushrooms in this too.  The brown mushrooms that are more common in stores now work really well.  I've also made it with wild morels, wild oyster mushrooms, fresh shitaki mushrooms,  and chanterells.  Also, I usually use Better than Bouillon chicken bouillon.  I love Better than Bouillon products, it is so easy to use and it makes things taste so good.  I add it to all kinds of things, including mashed potatoes, gravy, clam chowder and Finnan Haddie (clam flavored).

This dip can also be used in other ways.  I've been known to make cream of mushroom soup by adding milk or cream and chicken broth.  You can also make an appetizer by placing a teaspoon of the dip on a long strip of phyllo dough then folding the phyllo dough over it like you would fold a flag to make a triangle of dough stuffed with mushroom dip.  I would brush that with melted butter then brown them in an oven.  My favorite way to use mushroom dip is to stir it into scrambled eggs then spoon my grandma's chili sauce over the top.


HOT MUSHROOM DIP
1 lb.           mushrooms
1 med.       onion
8 Tbsp       butter
2 Tbsp       flour
1 Tbsp       lemon juice
1 lb.           carton sour cream (may use low-fat sour cream)
2 tsp.         chicken or vegetarian “Better than Bullion” or granules
                  Tabasco sauce, mustard or salt and pepper to taste

Finely mince onion.  Finely mince mushrooms.  A food processor is the best tool for doing this

Melt 6 Tbsp. butter in a sauté pan add minced onion and cook until softened.  Add mushrooms and sauté until softened.  Add remaining butter and melt, add flour and cook flour until a paste is formed.  Add bullion and sour cream.  Heat through and cook a while longer until the mixture thickens.  

Add lemon juice and salt and pepper to taste.

Best served hot but may be served at room temperature with potato chips.